

Construction Coming Together
So here is Part III of my Warhound Titan. Here are the links to 'Part I' and 'Part II' if you have not already read them. In this post, I will go through the construction of the Head and Torso with the difficulties faced and also my enjoyment of magnetization. The whole model has started to come together and is looking quite impressive. I will apologise in advance for the photo quality as these were taken on my phone, but I will be taken some top notch photos of the whole Titan when it is completed. Enjoy...
Void Shields


I think this is where my love of using magnets really started. From the outset I want to be able to represent the damage taken on the Titan and also be able to dismantle the model for transportation purposes. I took the plunge and started on the void shields. I used 3.2mm x 2mm magnets with a corresponding sized drill bit. Pretty basic and very easy to accomplish with the Forge World resin, making sure the polarity was right I glued the magnets in and they were done. Now I have not created them as yet, but I intend on making some small magnetized smoke markers for the damaged void shields. when a void goes down the void shield its self gets removed and a column of smoke gets added on for effect. Should look good when completed.
Sensor


I am not really sure why I did this, I think it was because I could, but I magnetized the sensor on the underside of the Air Filtration Unit on the body / canopy (that's what I think it is, if you know differently please comment) this is also probably where I started to get a little excited using them.
Head


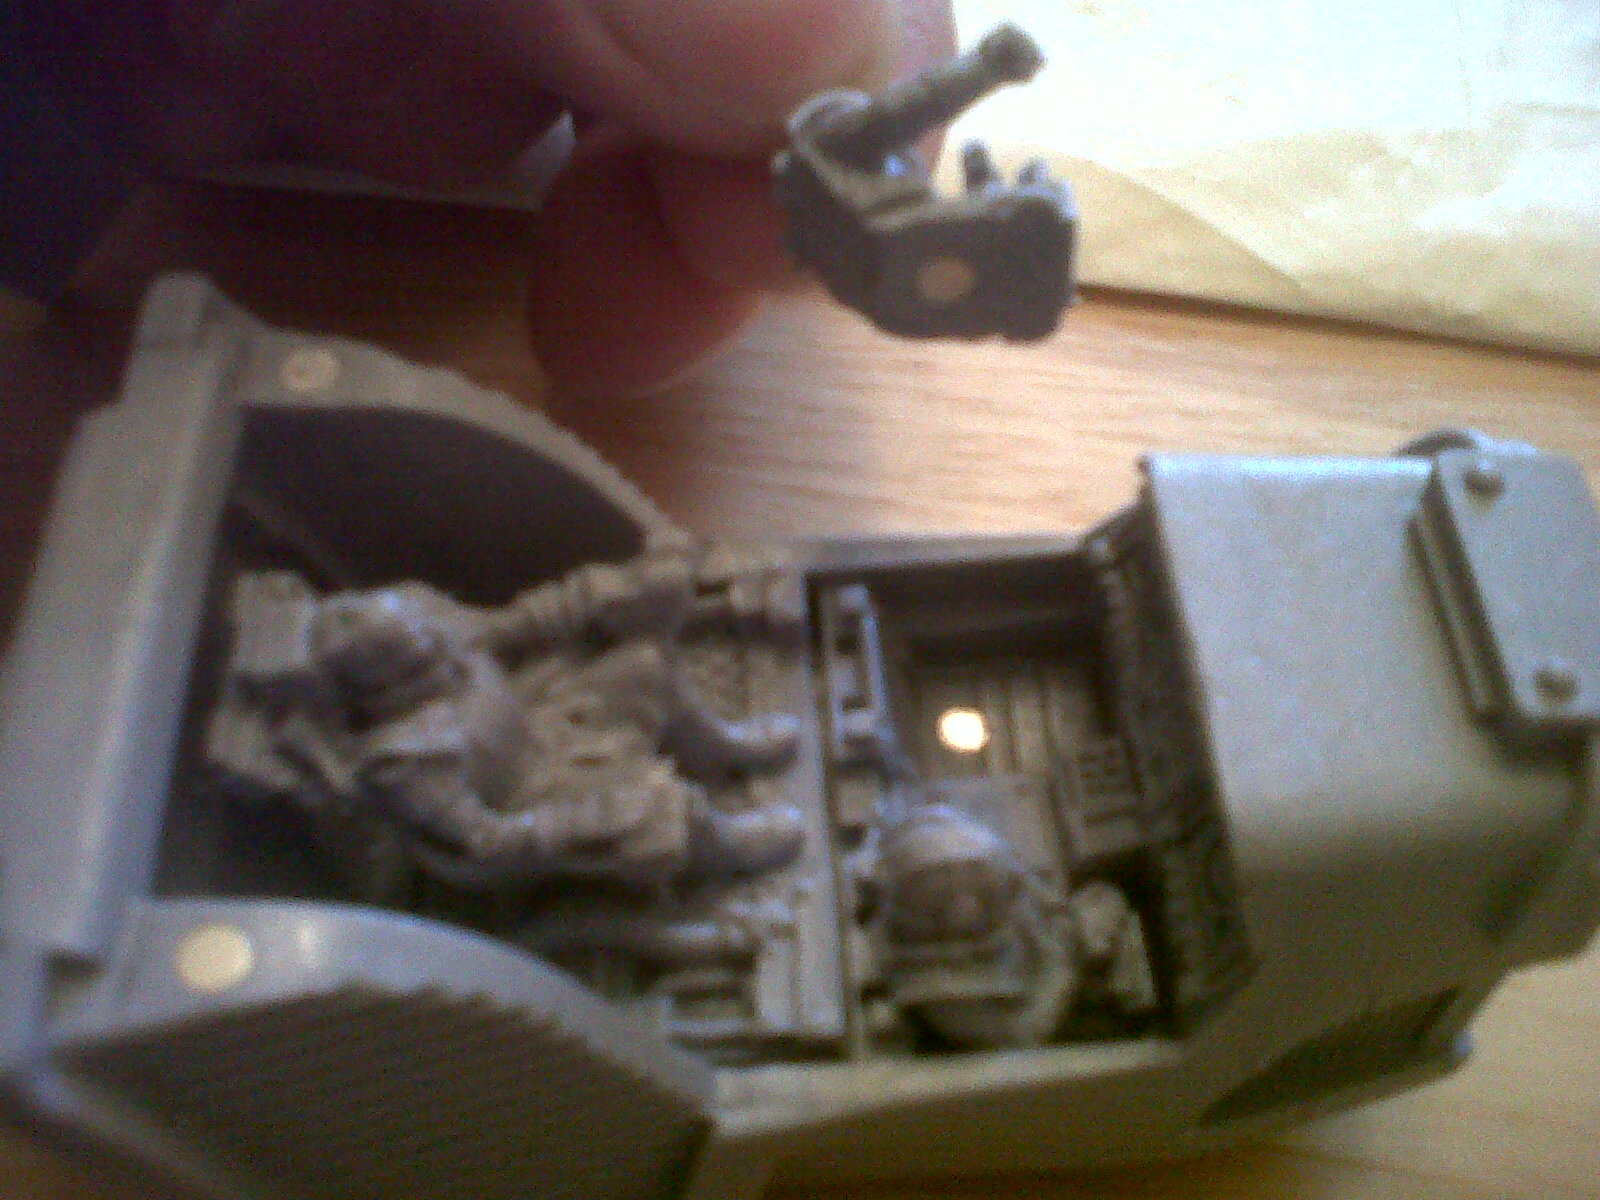

I really enjoyed this part of the assembly, it is one of the focal points of the model and looks awesome. I wanted to be able to show off the inside of the cockpit so out came the magnets yet again. These were place so to secure the two halves of the head together. The one thing I have achieved throughout the whole magnet process, is to recess them perfectly so once painted they are very hard to see. With the head done I moved into the cockpit interior. I magnetized the Princeps and two Moderati.
The idea behind this is to note vehicle damage. The result of a 1, one Moderati gets removed, the result of a 2, both Moderati get removed and the result of a 3, the Princeps gets removed. It is just my way of noting the damage just like the structure points and the legs in the last post.
I have not got photos of it for this post, but the armoured plat covering the waist has also been magnetized and this will have another bit of damage attachment to represent an Immobilised result.
.jpg)
.jpg)
.jpg)
.jpg)
.jpg)
.jpg)
.jpg)
Here is the painted cockpit, I have not yet finished the outside due to having a few issues with yellow. I wanted to do as good a job as I possible could. I tried to give the appearance of age which I feel has come out quite well. it was really fun to paint I can't help but keep looking at it. Better photos will follow when the Model is complete. All the gauges and screens were quite hard to do but thankfully I could remove the crew to reach some of the harder places. I love the way the Princeps looks over the crew and when the cover is on, he can also look right out of the eye slits.
I decided to paint the crew in blue with a spot of yellow to tie in with their background fluff (found 'Here' if you have not read it). The Imperial Aquila with a purity seal that sits between the two Moderati is kind of cool. I could just imagine that beneath the sealed panel is a self destruct button, used at the last moment to prevent the Titan falling to enemy hands and taking a few things out with it.
Yellow! Argh... so I attempted several times to paint the head yellow, resulting in failure every time. The worst thing about it was the citadel paint would not come off! And believe me I tried everything, I ended up having to scratch the paint off which unfortunately left the top canopy with slight scratching. However it does give the head a kind of (I have been in war zones for centuries) kind of look. Before it is finished I might try once more. Any tips would be VERY helpful. Please comment.
Yellow! Argh... so I attempted several times to paint the head yellow, resulting in failure every time. The worst thing about it was the citadel paint would not come off! And believe me I tried everything, I ended up having to scratch the paint off which unfortunately left the top canopy with slight scratching. However it does give the head a kind of (I have been in war zones for centuries) kind of look. Before it is finished I might try once more. Any tips would be VERY helpful. Please comment.
Torso Interior
.jpg)
.jpg)
.jpg)
.jpg)
.jpg)
Imperial Aquila icon and shrine.
.jpg)
.jpg)
Mechanicum symbol and shrine. Candles and all.
.jpg)
.jpg)
.jpg)
The Warhound Titans name 'Canis Nex' has been added to the computer console on the brass plaque above the screen.
.jpg)
.jpg)
Right arm Gun Servitor
.jpg)
Left arm Gun Servitor
.jpg)
.jpg)
Amazing fun to paint, I have almost finished the interior. I painted this before gluing the parts together otherwise I would have never been able to paint it all. I have a few more details to finish off as well as the Techpreist and Servitor.
Dry Fit, Dry Fit, Dry Fit! I must have done that a hundred times before finally gluing. I did need to shave down the resin on some parts and add quite a bit of green stuff on others, but the final fit is near on perfect. After researching I found virtually everyone pinned the torso, but I found that the amount of glue require plus the excellent surface contact negated the use on pinning.
Extras
.jpg)
.jpg)
At the rear of the torso there is a block, not sure what it is supposed to be, but I wanted to do something with it. So I purchased an Imperial Guard tank vox transmitter off of ebay, magnetized it (again with the magnets) and with a little trimming and green stuff I was able to add it to the back of the Titan. And I think it looks fantastic! It adds that little extra.
.jpg)
.jpg)
Here you can see the Void Shields attached and removed, will look good with little smoke markers. Not sure what to make them out of though. Any ideas?
.jpg)
.jpg)
Here is the blast door to seal off the reactor from the main interior. Imperial Aquila one side, Mechanicum symbol on the other.
.jpg)
.jpg)
.jpg)
.jpg)
.jpg)
The Techpriest and Servitor have both been magnetized for easy removal. Mainly to better see the interior. With the blast door fitted (that can also be removed) you can really see the tight space the Techpriest works in. The Servitor that I also got from ebay is posed as though it has just come up from the service lift to continue its duties. The Techpriest is from Forge World but I cut off his right arm and converted it to fit in the tight compartment. I will do another post I think with the entire Titan crew and a little description of them.
Undercoating
If you have read the other posts, you will be aware of my concerns and research into undercoating and what to use. Being as I prepared the resin to the best I could, I settled on using normal Games Workshop Chaos Black Spray paint and hoping for the best. The moral of the story here, is that if you prep you're model well enough and invest time into the cleaning process. Normal paint will adhere to the model perfectly with no problem at all. I have avoided all of the horror stories I have read about paint pealing off, the paint not taking hold and more. So yes, prep it well and the paint sticks!
Stats:
Pins used
- 68 total, no more have been needed yet.
Magnets used
- 50 total, three for the head crew, four for the head canopy, sixteen to hold on the canopy, four to hold the torso crew in place, two for the Vox Transmitter, four on the Void shields, two for the interior sensor. a total of 35 for the torso.
That's it for this post, I really hope you have enjoyed it. I am looking forward to hearing you're comments and advice especially on the Yellow paint for the head. And if anyone has ideas for sturdy smoke markers, please let me know. Part four will be arriving soon. And remember, if you are building one yourself, Dry Fit, Dry Fit, Dry Fit!
~ Burn the heretic. Kill the mutant, Purge the unclean ~
I stumbled across this article while Google searching for tips on how to paint a Warhound.
ReplyDeleteUnfortunately, I don't have any idea how to help with the yellow as I avoid painting in that color like the devil! Though, there was a trick I heard of a while back that you should undercoat with white first to get the yellow to come out. Dunno if it works though, so take that with a grain of salt.
I just ordered an assembled Warhound off Ebay which is what lead me on the Google search.
Are you going to be painting yours by hand or with an airbrush?
And which Legio are you planning on going with?
Congratulations on you're Warhound Titan purchase. I must say for myself, the building is a lot of fun and one of the reasons for getting it, plus the model is awesome.
ReplyDeleteI have done a little more research into the yellow, but still a little apprehensive.
I don't own an airbrush so I will be painting the entire model by hand. As for the colour scheme, it will originally be from Legio Astorum (The Warp Runners), you will be able to read a little more into the idea behind the Titan and colour in this post. Inquisitorial Warhound Titan
Good luck with you're Titan.
Glad to know I won't be the only one hand painting a titan!
DeleteI like the Warp Runners scheme, and I just read your post on the Inquisitorial Titan. T'was a great read and a fantastic background for your Titan.
I'll have to write something up for my own Warhound (as of yet unnamed) to give it some life. Though I think I'm going with the Legio Crucius (Warmongers) scheme. There's just something about the black and white that is awesome.
Yep, slogging it with a brush lol...
DeleteGreat Legio to come from i think. Very brave, apart from yellow, white is my only other pain. Good luck and I hope to see your progress. Also looking forward to the background when you get there.
Thanks! I'll be keeping an eye on what you've got going on here. Can't wait to see the Warhound finished. Not enough of them online, honestly.
DeleteNice job so far. Love the interior detailing! The cockpit control panel is ace, and the torso interior is well done.
ReplyDeleteAs for painting yellow I have some experience as I have a Tau army painted in red and yellow. If you're not using an air brush then you definitely need a white undercoat to start. The very large areas will be tricky! However start with a base coat of bubonic brown (the old GW paint)or a newer equivalent (see GW conversion chart) mixed with white, thin this and apply one or more coats as needed to get an even and smooth finish. The key is to have it not too thin but not too thick, too thin and it will run and pool, too thick and it will dry as you apply it and leave a crappy finish, practice on a scrap piece of plasti-card or the like til you're comfortable with the technique. Once the base is done you can then apply yriel yellow (or the old GW golden yellow) again being very careful with your paint consistency. Trust me with practice you'll get it and become quite quick and confident,(I've been using this technique to paint white on my marines for years now). Then just paint layers as you want, to give the finished colour you want and highlight as normal.
The KEY is a smooth consistent base coat just a bit darker than your first yellow layer, on top of a smooth white undercoat. It's all about the physics of light passing through pigments which I'm not going to bore you with :)
Another important point is to only paint a surface when it is horizontal and level, as your paint will be quite wet and runny, don't be tempted to rush and don't move the painted piece til it's fully dried. The biggest issue here is when you're painting a curved surface, you need to be super patient and just paint a bit at a time, moving the piece as the previous "face" is dry to paint the next bit. As long as the paint is smooth and the correct consistency it will blend ok, any slight streaks along joins can be hidden by the later layers and highlights.
I think that about covers it.
Oh the other KEY; PATIENCE
Hope that helps and good luck, I look forward to seeing the finished model.
And see you at Worcester War.
Thank you very much for the advise, I will be putting this into practice soon. I really do want to have the head yellow so this will help. Thanks again and see you at WW13.
ReplyDeleteAre you still happy with the pose? did it work well on the table? is it stable enough for gaming?
ReplyDeleteWhat did you use to drill the sockets in the resin for those magnets?
ReplyDeleteI am looking to buy a Chaos Warhound some time in the near future and though I have ample experience with Forge World models, something that big is always daunting. And I do not look forward to all the drilling and bolting, to be honest. All advice I can get is welcome!