

Unpacking and Cleaning
OK, so obviously the picture above is NOT my Titan, this one is on the 'Forge World' website. But in February 2012 I did purchased one! Now at the moment it is not complete and I am ashamed to say that due to real life I had to put it on the side line for a while. I will now however over several posts, tell all of you who are interested, about the unpacking, the build, the many problems encountered while doing so, the painting and finally how it plays on the table top.
This is one beast of a model and no small project to take on. If I were to give any advise I would say, Do your research, take your time (lots of it) and remember, Its your model, so do what you want to do. As I have mentioned before, I am just an average modeller and painter so to achieve what I have on the model, to me is outstanding.
The first thing I have to say is that Forge World dispatched this model very quickly, I ordered it on a Saturday night and it was delivered the following Tuesday afternoon. (thanks FW)
Unpacking
So the box was heavy, and as many of you will understand, I was very excited to open it up and take a look inside. Wow, I do think that was the first words I said. It was in lots of bags and on top was an envelope with a few other bits in. Apart from the latest FW catalogue, there was some clear plastic to be used in the cockpit windows, a metal grate for the engine cover and what I call the birth certificate. Yes with it was an official A4 certificate from the Apeptus Mechanicus.

With all my excitement I did not take as many photos as I should have, but here is what it looked like when it was all unpacked and spread out on the floor.
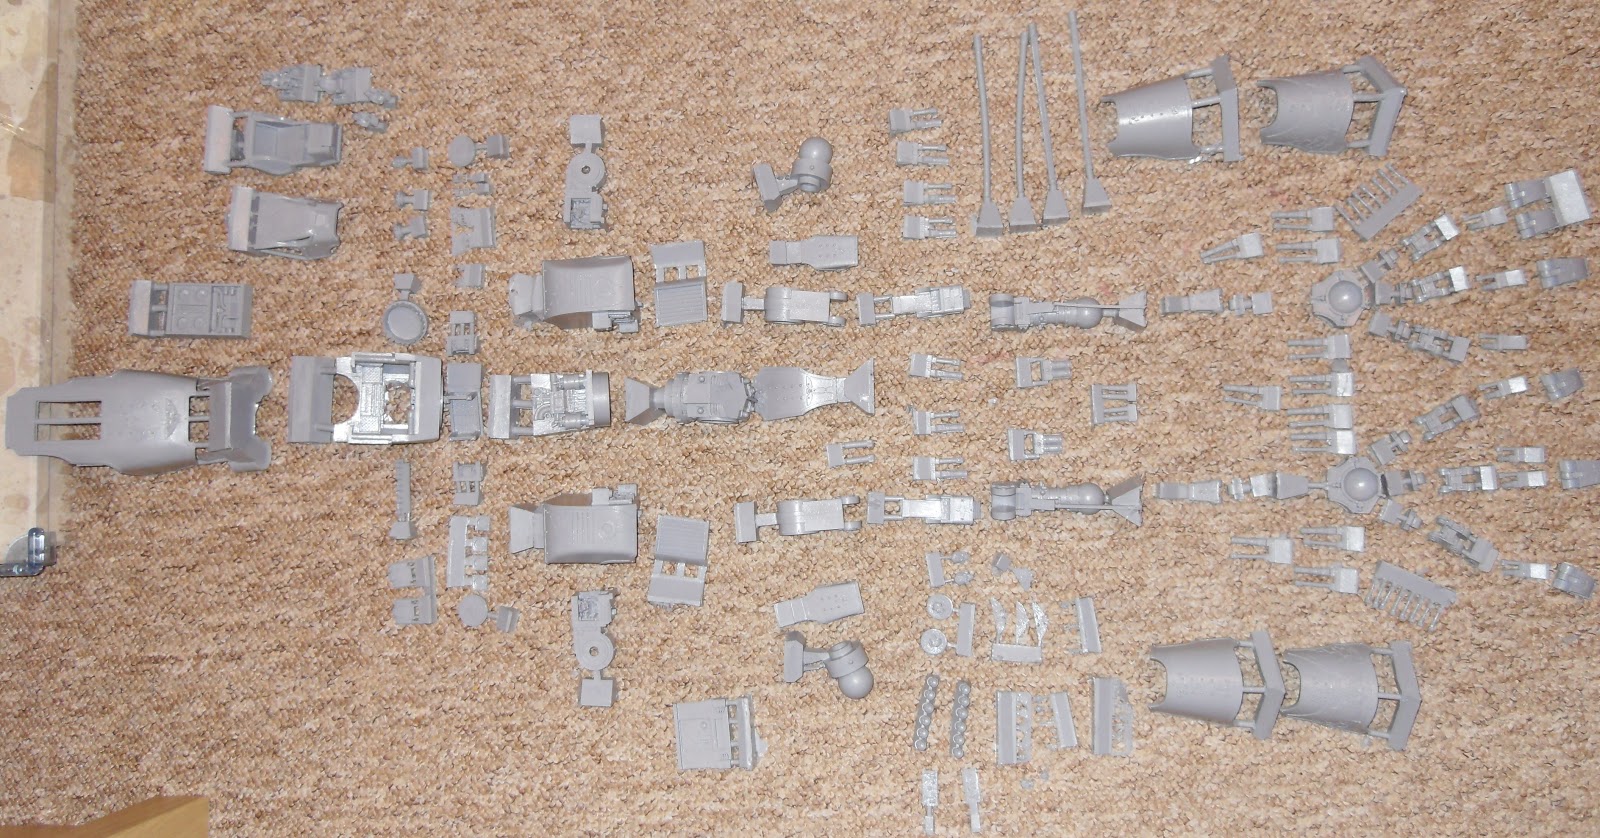


I must have looked at it for a hour in awe! As you can see, it comprises of a lot of parts and quite a few of them at this stage are still attached to resin sprue's. You do get an instruction Manual with the model to help put it together, so at this point I took the time to check I had all the parts. All were there with a few little spare bits, plus you get four ankle guards! Two plain and two with Imperial Eagles and scroll work on them. I also inspected every piece to make sure the cast was OK. Other than a couple of leg pistons that must have slipped in the mould, all was good, I did have spares for these parts so I never contacted FW to replace them.
Washing
As I mentioned before, do your research! This is exactly what I did. One of the re-occurring problems people have with FW models, is the release agent that is used on the mould. This cannot be avoided as it helps get the parts out after they have been cast. Unfortunately this does leave a greasy residue on the model.

Now a lot of people have given their models a quick dip in warm soapy water, but most have later found that the paint will not stick. And when you have got to that stage, it can be a little late. I prepared a bowl of warm (not hot) water, and added in some washing up liquid. Using the Flash Brush from Games Workshops 'Clean-up Kit', I proceeded to gently scrub the entire kit which coincidently took a good two hours.

I then placed the parts out on a try to fully dry for about a day. Here is where I hit problem one! According to my research after washing the parts, there should be no residue left on the model a quick dip should do. Getting a little paranoid I felt all the parts and thought "yeah great", but something niggled in the back of my mind, so I though I would test a few parts by putting a bit of Citadel paint on them. I am glad I did this test, because while some parts were fine, on other parts, especially flat surfaces the paint did not adhere to the resin at all.

At this point I hit the internet again and stepped up the cleaning process. Eventually I stopped searching and asked myself what I though would get rid of the grease. I ended up after doing a test patch using CIF! I figured if it cleans ovens fine it should clean a Titan (gulp). So another two hours and a day for drying later, I tested the model again (Result). So top tip one. do some random test patches after washing with the paint your planning to use on your model so you get it right first time, and when using a cleaner, do another test. Remember, this is an expensive model, treat it with respect and care.
I was now happy the parts were thoroughly clean! The next stage was the build, but I realised that I needed to prepare for this properly too. Hitting the net again I came across two thing!
- Resin dust is VERY bad for your health if inhaled!
- A razor saw WILL be needed.


On that note I purchase a 'Razor Saw' from Games Workshop (might I add, this is one of my best tools now) and I also stopped off at a pound shop and got hold of some full face masks so I did not inhale any resin dust while working.
Fully prepared I proceeded to cut off all the excess resin from the Titan parts with the Razor Saw and using Mould line remover and a file, tidied up every part ready for assembly. This took several day as real life came first, but when finished I was ready to Build. Below is a photo of all the off cuts that I DID save, it weight in at around 700g. The good thing is that I already have some plans to use the off cuts for terrain, there were quite a few bits that are perfect to be used as tank traps or Dragons teeth as they are known.

So that's it for part I. Next will be the Assembly of the Titan which had its own problems to face and the decisions I made to overcome them.
If any body has any questions, please feel free to comment or email me via the Contacts page. I have not yet finished painting the model so any advise would also be welcome.
~ If the might of the Imperial Guard cannot defeat the enemy, Send in a Titan to Crush them instead ~
I believe that the required response here starts with "pictures" and ends with "... or it never happened"
ReplyDeleteWow that was weird... the whole time I was posting the comment the only picture on the post was the titan. Then when I posted I saw all your other pics proving it did, in fact, happen.
DeleteLooking forward to seeing the rest of it
Ha ha, no worries, I think it's the certificate photo, it was quite a large file that slows down the loading a little. I had my 2nd ever game with it last weekend and will be posting a battle report soon so you have a glimpse before the rest of the post are finished.
DeleteHappy gaming
Swarfega works really well on greasy models too, was recommended it the other day by Forge World for the first time. might be worth a shout :)
ReplyDeleteBe great to see it on Titan Owners Club too! http://titanownersclub.blogspot.co.uk/?m=1